Frequently Asked Questions
App Version: 7.0.0 (Build 34) onwards
Getting Started
Presentify is a macOS menu bar app, so it doesn't have a traditional window. To get started, click the Presentify icon in Launchpad or type "Presentify" in Spotlight and press Return. After that, a small Presentify icon appears in the menu bar. Click it to start annotating any screen or highlight your cursor. You can also toggle these features with keyboard shortcuts.
If there's not enough space in your menu bar, you may not see the Presentify icon. To resolve this, use an app like Ice (free and open source) to declutter your menu bar and free up space. Watch this video to see it in action.
You can click on the support link found at the bottom of this page. However, keep in mind that sometimes it can take a few hours to get a response.
Additionally, you can ask on X, and follow @softal_io to stay abreast of the latest updates.
Presentify doesn't offer a trial version on the App Store, but you can definitely try it out on Setapp for free. They give a 7-day free trial to try out all the apps on their store, not just Presentify.
If for some reason you only prefer the App Store, then you can easily request a full refund from Apple.com by following the instructions here if you're not satisfied with the app.
Yes, you can purchase the app directly on the website. After a successful payment, you’ll receive a .dmg installer for macOS and a license key to activate the app on your device.
Annotate Screen
(⇧) to get a straight line.(?) or the Slash (/) key to see all the keyboard shortcuts for annotating. Press the same key to hide the shortcuts window.(⌥) to fill the shape with a light semi-transparent color. The color would be the same as the draw color but would be partially transparent.W when in Annotate mode. Additionally, you can press the Question (?) or the Slash (/) key to view all Annotate related key shortcuts.(4) and start drawing.For now, you can take a screenshot of your annotations by pressing Command + Shift + 3 (⌘⇧3) to capture the entire screen or Command + Shift + 4 (⌘⇧4) to capture a portion of the screen.
In a later release, a save annotations feature will be added so that you can load the saved annotations and amend them as needed. There will also be a button to take a screenshot easily without the need to use any keyboard shortcuts.
Yes, of course. But make sure that you share your entire screen and not just one window. If you do not want to share the entire screen, then Zoom has a feature where you can share only a portion of the screen. Either of these options will work perfectly.
Alternatively, if you have more than one monitor, you can share the entire screen on one monitor and keep the private content on the other monitor.
If you're using OBS, then please select Display Capture as one of your Input Sources.
Yes, it does.
Keynote has two view modes: Presentation and Full Screen. Full Screen behaves like most apps. Presentation mode is more restrictive and prevents other apps from controlling the display, so many annotation tools don't work with it. However, Presentify works perfectly with Keynote in Presentation mode—there's just a simple setup step. Watch this YouTube video on using Presentify with Keynote Presentation mode to learn how.
After you write something, just use your mouse scroll (keeping your mouse pointer on top of the text) to increase/decrease the text size.
Touch Bar support will be added soon. This will help you to easily change the font size on your iPad too.
Esc key to come out of Text mode and into the Free hand mode.This happens when the 'Highlight Mode' is turned on. You can turn it off by pressing the H key when in annotation mode.
Additionally, when in annotation mode, you can press the Question (?) or the Slash (/) key to see all the keyboard shortcuts for annotating.
Sometimes you may want to quickly advance the slide you're presenting or scroll the webpage, etc. when Presentify is turned on. In such cases, you can simply press and hold the Fn key to interact with the underlying apps (and not Presentify). You can watch this video to learn more.
macOS can be configured to show the Emoji & Symbols window when the Fn or Globe key is pressed briefly. Since Presentify uses the Fn key for interacting with underlying apps while annotating, you may occasionally see the emoji window if the key is tapped instead of held.
To prevent this, open System Settings > Keyboard, find the Press Fn key to or Press Globe key to setting, and change it to Do Nothing. After that, you can still press and hold Fn in Presentify for interactive mode, but macOS won't open the emoji window on a short press.
When you start Annotate with this mode enabled, Presentify runs on the background and gets activated only when you press and hold the Fn key. This is useful when you need a distraction free experience and your main priority is the other application that you're working on. You can watch this video to learn more.
Cursor Highlight
Settings... > Cursor and change the style as per your need.Settings... > Cursor section.Settings... > Cursor section by enabling the "Turn Off When Inactive" option. This is enabled by default.Spotlight
Settings... > Cursor > Spotlight section.Settings... > Cursor > Spotlight section.Zoom
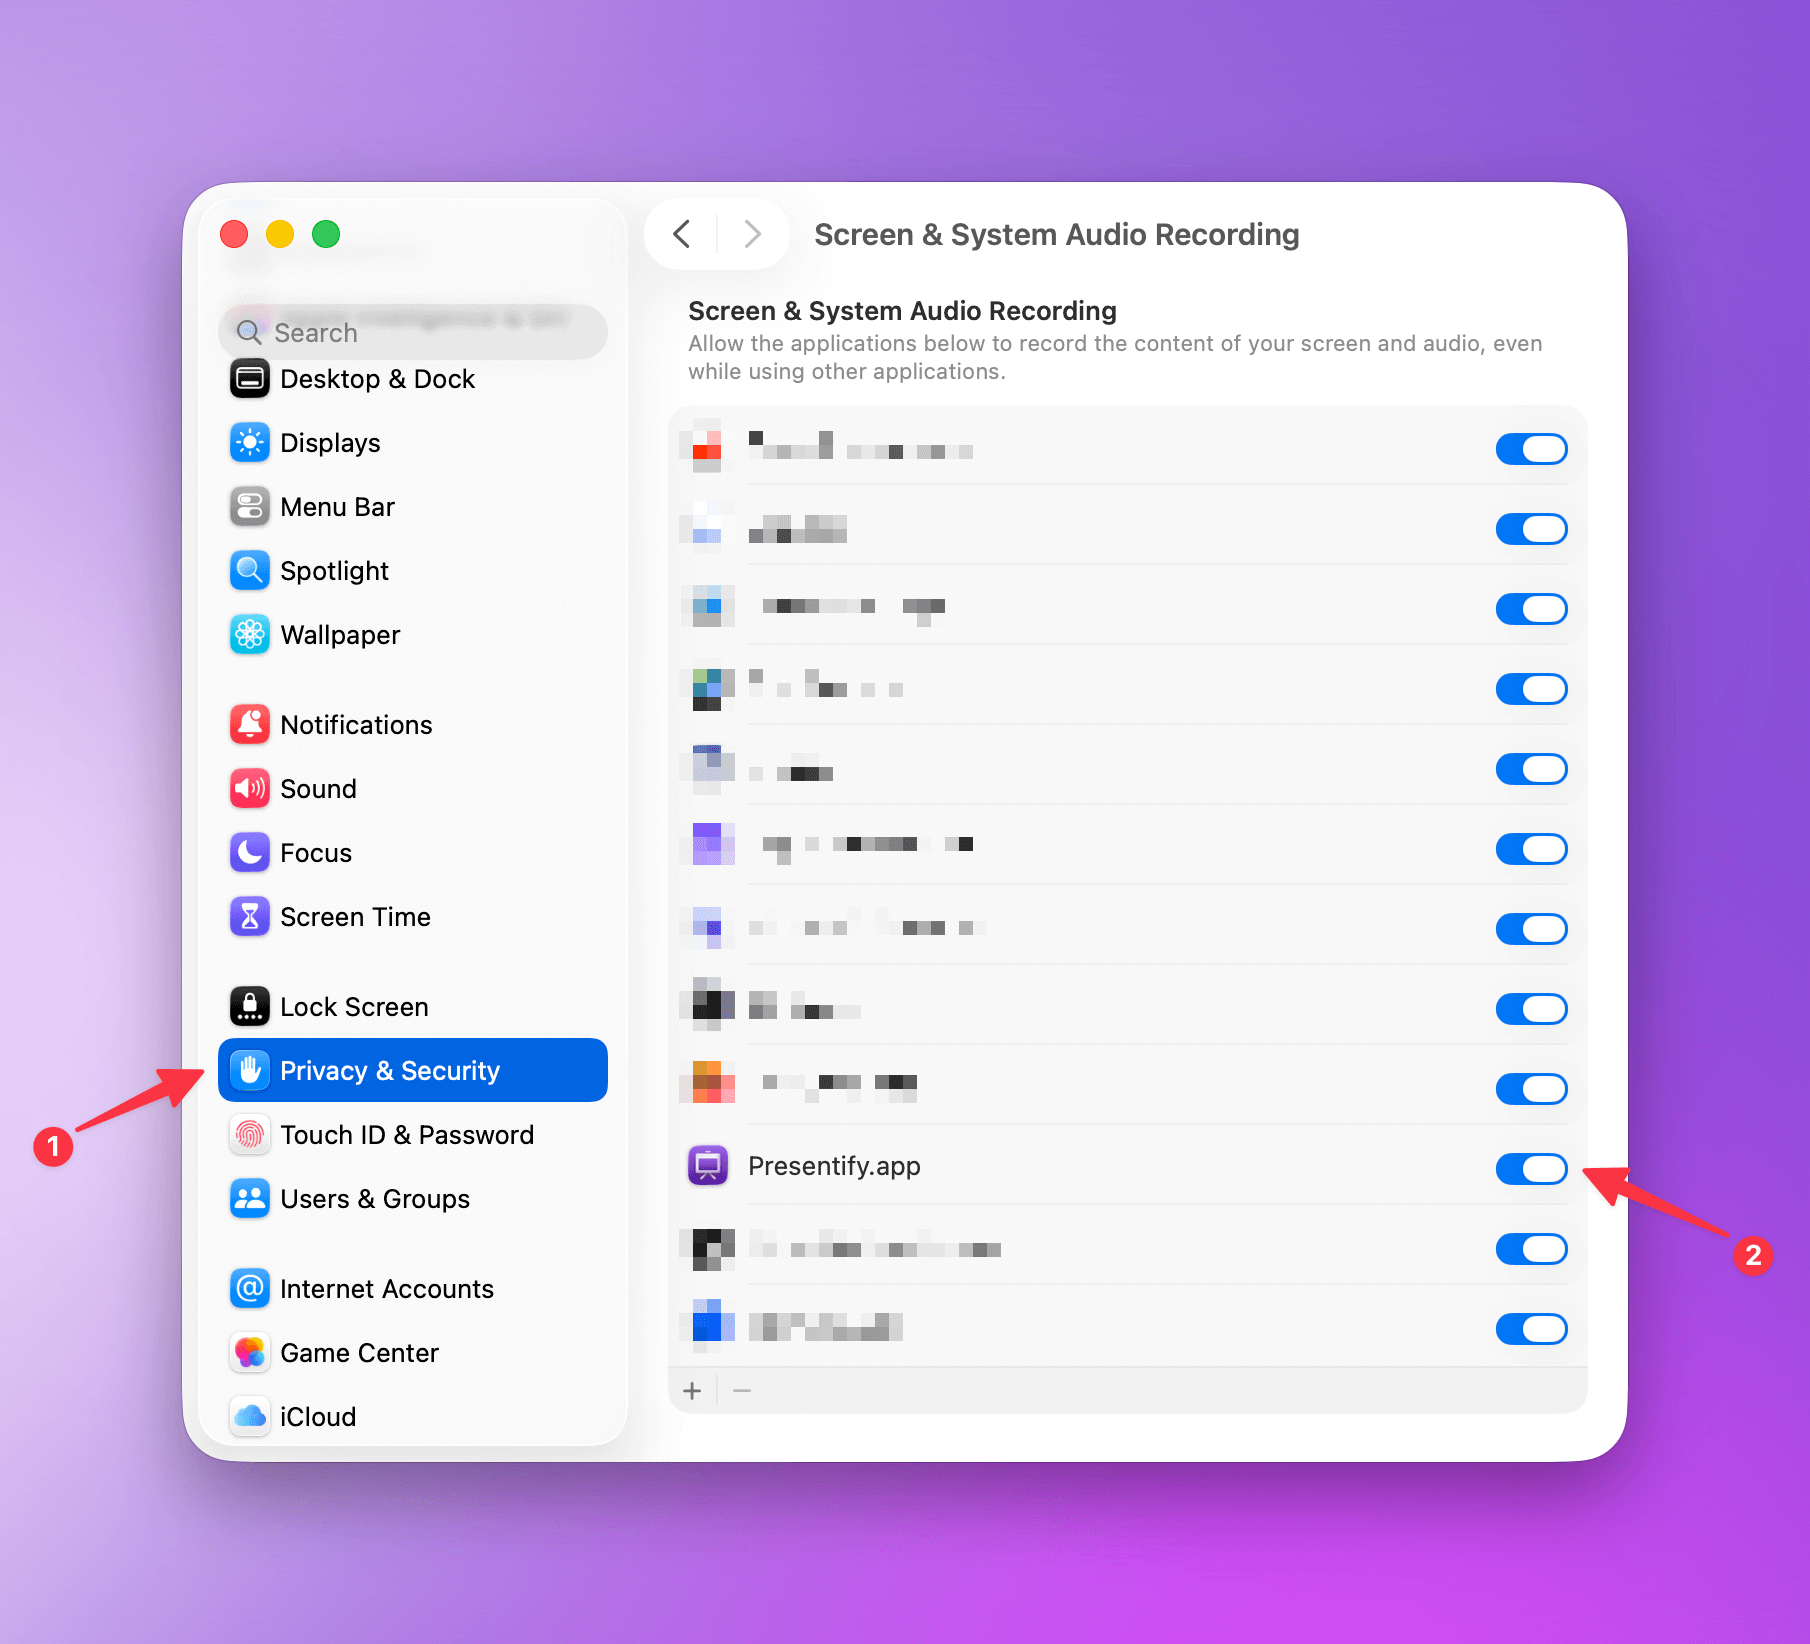
Settings... > Cursor > Zoom section.Settings... > Cursor > Zoom section. It currently supports both circular and squircle zoom shapes.Zoom feature works fine even on the latest version of macOS (macOS Tahoe). If it doesn't work for you, make sure you have given the right permissions as shown below:
Miscellaneous
The symbols resemble the keyboard shortcuts for the specific operation. The basic keys and their symbols are shown below:
| Key | Symbol |
|---|---|
| Command | ⌘ |
| Control | ⌃ |
| Option | ⌥ |
| Shift | ⇧ |
| Slash | / |
We're sorry to hear that you're not satisfied with Presentify. You can contact support by clicking on the support link below to see if your issue can be resolved.
If you need a refund for any other reason, you can easily request one from Apple.com by following the instructions here. If you have purchased the app directly from the website and not from the App Store, just click on the support link or reach out to us on X and we will refund you the full amount.
If you purchased Presentify directly from our website via Polar, you can manage and deactivate your devices from the Polar customer portal.
Open https://polar.sh/softal/portal, sign in with the email used during purchase, and deactivate the device you no longer use.